Laboratory balance is commonly used for sample preparation, weight measurement, and data recording in quality control processes. As a high-precision measuring instrument, its results depend not only on the equipment itself but also on how it is positioned, user handling, cleanliness, and regular inspection. A consistent operating procedure helps minimize unnecessary variations between weighing sessions.
Understanding the Basic Specifications of a Balance
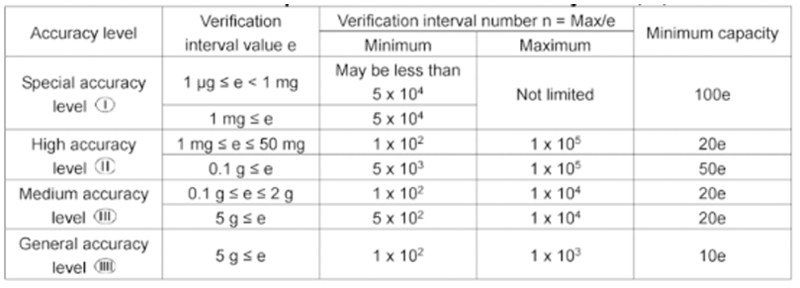
Before operation, users should familiarize themselves with the specifications displayed on the balance or provided in its technical documentation. The maximum weighing capacity is the highest load that the balance can handle. The minimum weighing capacity indicates the threshold below which the relative error of the measurement may increase significantly.
The actual scale interval, commonly designated as d, is the difference between two consecutive displayed values. Some balances can operate across different weighing ranges; when the load changes, the actual scale interval may vary between ranges. Concepts such as the verification value and permissible error should be evaluated according to applicable regulations, technical documentation, and the control requirements of the organization.
The suitability of a balance should not be determined solely by the number of decimal places shown on the display. The load being measured, display stability, and intended operating range should also be considered when evaluating measurement results.
Laboratory Balance Operating Procedure
1. Check the Balance Position and Condition
Place the balance on a stable surface and check the level indicator if the equipment is equipped with one. If necessary, adjust the balance feet until the instrument is properly leveled. This should be done before starting work and after moving the balance.
After a prolonged power outage, the balance can be switched on and allowed to stabilize according to the manufacturer's operating instructions. Do not read or record the result while the display is still unstable.
2. Prepare the Weighing Container
Open the draft shield, place the weighing paper or container on the weighing pan, and wait for the display to stabilize. Then use the zero or tare function available on the balance. Close the draft shield and check the display again before adding the sample.
For an analytical balance with high resolution, the draft shield should be closed before reading the result to minimize the effect of air currents on the displayed value.
3. Place the Sample and Record the Result
Carefully place the item to be weighed on the weighing pan, avoiding drops or impacts. Close the draft shield before reading the measurement. Record the result only after the display has stabilized. If the measurement needs to be repeated, maintain the same sample positioning and operating conditions to make the results easier to compare.
Periodic Balance Checks Using a Stable-Mass Reference
One practical checking method is to select an object with a stable mass, such as a calibration weight or an appropriate mass standard, and weigh it repeatedly. The measurements can be recorded and averaged to establish a reference value for monitoring. The reference object should be stored carefully and protected from moisture, wear, and contamination.
During the check, place the reference object at representative load ranges within the balance's intended operating range. This makes it possible to observe measurement stability at different load levels rather than evaluating the balance at only one mass value. The recorded values should be compared with the established reference and the applicable error limits for the equipment. If an abnormal result is observed, further checks should be carried out according to the internal procedure before drawing conclusions.
Daily Laboratory Balance Maintenance
Laboratory balance maintenance starts with simple steps after each use. Do not allow liquids to enter the balance. If a spill occurs, clean it promptly to minimize the risk of affecting internal components.
- Clean the weighing pan after completing the work to prevent particles from entering the sensor area.
- Clean stainless-steel components and the weighing pan regularly; do not use corrosive cleaning agents.
- Use an air blower or a small brush to remove dust and sample residues from appropriate areas.
- Make sure all components are dry before reassembly and operation.
- After cleaning, check the balance level, switch on the balance, and verify that it is operating normally.
If a precision balance has a built-in automatic calibration function, users can perform calibration according to the equipment's operating instructions. For applications with strict quality control requirements, balance operation, inspection, and maintenance should be documented consistently to support traceability of the balance's condition in the laboratory.