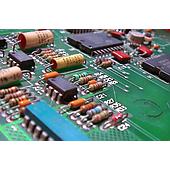
How to remove tin and solder lead from defective soldered components
When a repairman makes a soldering error on an electronic component, properly removing lead must ensure cleanliness and high aesthetics. There are many effective methods to remove lead from defective solder joints that you can refer to and apply.

C1: Use a tin vacuum cleaner
One of the most popular and convenient ways is to use a tin suction gun. You need to prepare a good quality tin smoking gun, easy to find at specialized stores. To operate more effectively, you can wrap a piece of rubber about 2cm long on the tip of the gun, helping the tin smoking process go smoothly and cleanly.
The method is very simple: first, you can use a little resin to melt the old solder joint. When the tin begins to melt, place the tip of the gun close to the weld and press the button. The rubber section at the tip of the gun will help remove tin quickly, ensuring the weld has no traces left, keeping the circuit neat and safe when working.
C2: Use many small wire bundles to suction:
The second method to remove defective solder lead is to use small bundles of copper wire, which is very useful in cases where a desoldering gun is not available. For this method, you should choose copper wire with a moderately small core, not too thin to avoid breaking or damaging the circuit, but not too thick to ensure better tin absorption.
How to do it as follows: first, soak the copper wire in resin to ensure the wire has adhesion when smoking tin. Then, place the copper wire on the solder joint to be soldered, use the soldering iron to heat the wire and tin. When the tin melts, the copper wire will absorb a significant amount of tin from the solder joint, helping to clean the circuit.
To continue to suck the tin cleaner, you can lift the copper wire and flick it gently to remove the tin that has been sucked into the wire. This method, although simple, will help neatly remove excess tin and lead, ensuring the circuit becomes clean and safe for further repair.
Refer to related products:
EMIN soldering station
If you want to solder components without errors, what should you pay attention to:

Attention should be paid to standard welding techniques. Below are some points you need to keep in mind when soldering components to achieve the best results.
Select soldering iron
Choose the right welding torch: The first step to having a beautiful and durable weld is to choose a welding torch of the right type and quality. Before buying, you should carefully learn about the popular types of soldering irons on the market as well as their specifications. Comparing your needs with the characteristics of each type of soldering iron will help you choose the most suitable tool.
In order for the solder joint to be as beautiful and strong as possible, a very important step that you should not skip is coating the tip of the soldering iron with tin before use.
Tin coating for soldering iron:
The steps for tinning the soldering iron are as follows:
1. Heat the soldering iron: Start the soldering iron and let it come into contact with the resin, helping the resin melt and adhere evenly to the tip of the soldering iron. This is a protective layer that makes it easier for tin to stick to the tip of the soldering iron.
2. Contact with tin: After being coated with resin, place the tip of the soldering iron in places where tin is available so that the tin can adhere evenly to the tip of the soldering iron.
3. Avoid oxidation: To prevent the soldering iron from oxidizing, avoid leaving it in a hot state without contact with any material for long periods of time. If the tip of the soldering iron is oxidized, the tin will have difficulty sticking and will affect the quality of the weld.
Adjust the appropriate welding heat level:

If the temperature is too low, it will be difficult for tin to melt, but if it is too high, it can burn out the circuit or damage components. The ideal temperature for tin to melt is from 200 - 280°C, so you need to choose the appropriate heat level in the range of 240 - 350°C, depending on the requirements of each type of circuit and soldering iron.
- Glued components and ICs: Choose a temperature of about 240 - 260°C to avoid affecting small and sensitive components.
- Separate components: A temperature of 260°C is usually suitable.
In addition, the time to hold the solder tip at the component base should be limited to about 5 - 7 seconds to avoid causing damage to the circuit.
Cleaning the weld is also
This is an indispensable step to ensure a bright, beautiful and durable weld. After soldering, use a sufficient amount of alcohol or acetone to clean the contact points on the circuit, helping to remove dirt and make the circuit shiny, increasing the aesthetics and durability of the weld.
Re-plate the soldering tip
The procedure for re-plating the soldering tip is as follows:
1. Clean the soldering tip: Use a small blade to scrape off the oxidation layer and residue on the soldering tip to ensure the contact surface is clean and ready for tin plating.
2. Heat the soldering tip: Turn on the soldering iron to heat the tip, then put the soldering tip into the flux to soften and prepare the surface.
3. Tin plating: Put a sufficient amount of tin on the tip of the soldering tip, creating an even tin coating on about 5mm of the soldering tip.
Hopefully the information on how to remove lead from defective soldered components can help your work. In case you make a soldering error using the above methods, you can contact EMIN for support as soon as possible.