For full functionality of this site it is necessary to enable JavaScript.
EMIN.VN
0

Digimatic Caliper Calibration Procedure

04/26/2021 13:37:28

**INSTRUCTION**** ** ** ** **1\. Range of application** This technical document specifies the calibration of digimatic calipers with up to 600 mm in me

INSTRUCTION


1. Range of application

This technical document specifies the calibration of digimatic calipers with up to 600 mm in measuring range and 0.01 mm resolution.

2. Calibrating techniques
- Outside check
- Technical check
- Measurement check

3. Calibrating instruments
3.1 Standard measuring instrument (s)
Caliper checker: 
- Range of Measurement: (20 ÷ 300) mm
                                          (20 ÷ 600) mm
- Accuracy: ± 5 µm (L ≤ 300 mm)
                   ± 7 µm (L > 300 mm)

3.2 Other measuring instrument (s)

Inside and Outside Micrometer: 

- Range of Measurement: (0 ÷ 25) mm

                                          (5 ÷ 30) mm

- Resolution: 0.001 mm

- Accuracy: ± 1 μm

                   ± 5 μm

3.3 Supporting instrument (s)

Hygro-Thermometer:
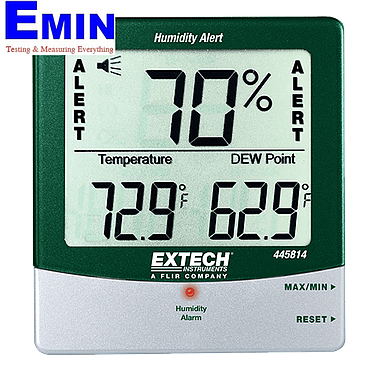
EXTECH 445814 Hygro-Thermometer Humidity Alert with Dew Point

- Range of Measurement: (0 ÷ 50) °C

- Accuracy: ± 0,5 °C

- Range of Measurement: (10 ÷ 95) %RH

- Accuracy: ± 3 %RH

4. Auxiliary Instrument(s)

- Specialized cleaning solution and towel

5. Conditions for Calibration

- Temperature: (23 ± 5) °C

- Humidity: no higher than (50 ± 15) %RH

6. Prepare for Calibration
Prior to the calibration, the following preparations must be done:
- Prepare the standard instrument
- Select the suitable standard instrument to calibrate the caliper.
- Use the cleaning solution and specialized wipes to clean the surface of the standard instrument.
- Place standard instruments in the calibration room for temperature stabilization for at least two hours.
Prepare the caliper to be calibrated:
- Clean the caliper and its jaws with industrial gasoline or equivalent solvents.
- Place the caliper near the standard instrument in the calibration room for at least two hours to stabilize the temperature before performing the calibration.
7. Begin the calibration
7.1 Outside Check
7.2 Technical Check
7.3 Measurement Check
7.3.1 Identify the accuracy of the caliper
- Outside measurement
- Inside Measurement
7.3.2 Check the deviation of the jaw
- Outside jaws
- Inside Jaws

8. Reliability Evaluation

9. General handling

a. The calibrated caliper is stamped, certified in paper along with calibration results, and measurement uncertainty.

b. The recommended calibration cycle of digimatic caliper is 12 months.

10. About EMIN's Calibration - Verification - Repair center

EMIN Vietnam’s Calibration and Verification center has been established since 2020 to provide after-sales services. The Calibration and Verification center is thoroughly equipped with technical equipment, followed by the assistance from various equipment manufacturers around the globe. At the center, calibration of specialized equipment is successfully carried out by experienced engineers in EMIN Vietnam, ensuring fast, accurate, reliable procedure to meet the most demanding customers’ requirements). Such technical capacity can only be performed by very few technology businesses in Vietnam. Meanwhile, after tireless effort, the Calibration and Verification center of EMIN Vietnam is officially certified to be accredited by the ISO 17025 standard (Jan, 2021)

If you want your instruments calibrated, please contact:

Equipment Verification - Calibration - Repair Service Center - EMIN Vietnam JSC 

Address: No 203 Nguyen Ngoc Vu Street, Trung Hoa Ward, Cau Giay District, Ha Noi City

Email: services@emin.vn - Hotline: 0968.060.220

Further information about digimatic calibration service can be found here.

Related News

6 Essential Measuring Instruments in a Solar Technician’s Tool Bag
09/16/2026 14:19:49

A measurement toolkit for solar PV installers does not necessarily need to contain a large number of instruments or excessive functions. What matters is having the right tool for each task on the roof: measuring DC voltage, checking string current, verifying polarity, testing insulation, checking grounding, or commissioning the entire system.

5 Steps to Check Grounding for Rooftop Solar PV Systems During the Stormy Season
09/16/2026 11:51:17

Rooftop solar PV arrays are installed at elevated locations and contain numerous metal frames, aluminum rails, and long cable runs across the roof. As the stormy season approaches, the grounding and lightning protection systems should be inspected to ensure that fault current and lightning current can follow the intended paths.

Why Does a Soldering Iron Heat Up Quickly but Still Solder Slowly ?
09/16/2026 11:04:47

Before contacting the material, a handheld soldering iron mainly heats the soldering tip. Once soldering begins, heat is continuously transferred from the tip to the material. If the heat supply is not sufficient to compensate for heat loss, the temperature at the contact area drops and the processing time increases

Stay Updated with Offers

Get exclusive volume discounts, bulk pricing updates, and new product alerts delivered directly to your inbox.

By subscribing, you agree to our Terms of Service and Privacy Policy.

Quick Support

Direct access to our certified experts